



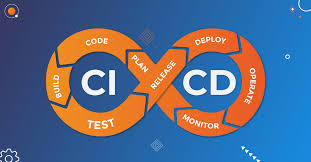
Integrating CI/CD into Flutter Applications
Continuous Integration (CI) and Continuous Deployment (CD) are essential practices in modern software development, ensuring that code changes are automatically tested and deployed to production environments. For Flutter applications, setting up CI/CD can streamline your development workflow, reduce errors, and improve code quality. This article will guide you through integrating CI/CD into your Flutter app using popular CI/CD tools like GitHub Actions, GitLab CI, and Bitrise.
Prerequisites
Before diving into CI/CD setup, ensure you have:
- A Flutter application repository hosted on GitHub, GitLab, or another version control system.
- Basic knowledge of Flutter and Dart.
- Familiarity with YAML files (used for configuring CI/CD pipelines).
Step 1: Choose a CI/CD Tool
Several CI/CD tools are compatible with Flutter. Popular choices include:
- GitHub Actions: Integrated with GitHub repositories, offers flexibility and ease of use.
- GitLab CI: Provides robust features and integrates seamlessly with GitLab repositories.
- Bitrise: A CI/CD service with out-of-the-box support for mobile apps, including Flutter.
Step 2: Set Up CI/CD with GitHub Actions
1. Create a GitHub Actions Workflow File
GitHub Actions uses YAML files to define workflows. Create a file named .github/workflows/flutter-ci.yml in your repository.
2. Define Your Workflow
Add the following YAML configuration to your flutter-ci.yml file:
name: Flutter CI

on:
  push:
    branches:
      - main
  pull_request:
    branches:
      - main

jobs:
  build:
    name: Build and Test
    runs-on: ubuntu-latest

    steps:
    - name: Checkout code
      uses: actions/checkout@v3

    - name: Set up Flutter
      uses: subosito/flutter-action@v3
      with:
        flutter-version: '3.7.0' # Specify your Flutter version

    - name: Install dependencies
      run: flutter pub get

    - name: Run tests
      run: flutter test

    - name: Build APK
      run: flutter build apk --release

    - name: Upload APK
      uses: actions/upload-artifact@v3
      with:
        name: release-apk
        path: build/app/outputs/flutter-apk/app-release.apk
3. Commit and Push
Commit and push the flutter-ci.yml file to your GitHub repository. GitHub Actions will automatically trigger the workflow on code push and pull requests.
Step 3: Set Up CI/CD with GitLab CI
1. Create a GitLab CI Configuration File
GitLab CI uses a file named .gitlab-ci.yml located in the root of your repository.
2. Define Your CI Pipeline
Add the following configuration to your .gitlab-ci.yml file:
image: cirrusci/flutter

stages:
  - test
  - build

cache:
  paths:
    - .pub-cache/

before_script:
  - flutter pub get

test:
  stage: test
  script:
    - flutter test

build:
  stage: build
  script:
    - flutter build apk --release
  artifacts:
    paths:
      - build/app/outputs/flutter-apk/app-release.apk
3. Commit and Push
Commit and push the .gitlab-ci.yml file to your GitLab repository. GitLab CI will start running the pipeline as per the defined stages.
Step 4: Set Up CI/CD with Bitrise
1. Create a Bitrise Account
Sign up for a Bitrise account and connect your Flutter repository.
2. Add a New App
- Select your repository and set up the project on Bitrise.
- Bitrise will automatically detect it’s a Flutter project and configure default workflows.
3. Customize Workflows
- Go to the Bitrise Dashboard.
- Modify the default workflows or create new ones to include steps for testing and building your Flutter app.
Example Workflow Configuration:
workflows:
  primary:
    steps:
    - git-clone:
        title: Clone the repository
    - flutter-installer:
        title: Install Flutter
    - flutter-analyze:
        title: Analyze code
    - flutter-test:
        title: Run tests
    - flutter-build:
        title: Build APK
    - deploy-to-bitrise-io:
        title: Deploy APK
4. Save and Start Build
Save the workflow and trigger a build from the Bitrise Dashboard. The pipeline will automatically run on commits and pull requests.
Conclusion
Integrating CI/CD into your Flutter application improves the development process by automating testing and deployment tasks. Whether you use GitHub Actions, GitLab CI, or Bitrise, the basic principles remain the same: automate testing, build, and deployment processes to maintain high-quality code and deliver faster updates. Customize the CI/CD pipelines according to your project needs and explore advanced features like multi-environment deployments and custom scripts to further enhance your workflow.
Innovative Mobile Solutions
Transform Ideas into Mobile Apps
Mobile Apps Tailored for Success
Seamless Mobile Experiences
Expert Mobile App Development